There’s a quote floating around somewhere that says:
“Don’t go broke trying to prove to other broke people that you ain’t broke.”
Many authors are on budgets now more than ever and this has created an entirely new source of income for graphic designers, many of whom offer premade book covers as well as custom made. These artists have made our life a little easier by offering professional covers at lower rates than custom covers. While custom covers are preferred, not everyone can afford a new custom cover for every book (except for people who make their own covers or knows of someone who does it for them free of cost) so consider this post for those of us “balling on a budget.” I believe in investing in your best and if you can afford to pay for a custom cover and high-priced editing, go for it. There’s nothing wrong with that. However, just know you don’t have to go broke to publish your book. The same way we can find reasonable editing prices is the same way we can find reasonable book cover prices for covers that won’t look generic.
Still, Premades have a unique struggle we must consider when choosing them.
All of the factors that go into articulating your story to a designer in a way that will help them to design a good cover is internal. By internal I mean that if you are choosing the premade, you have to make these decisions for yourself. You have to understand your target audience, your genre, and identify the key features enough to know if the cover is the right fit for you. This isn’t easy.
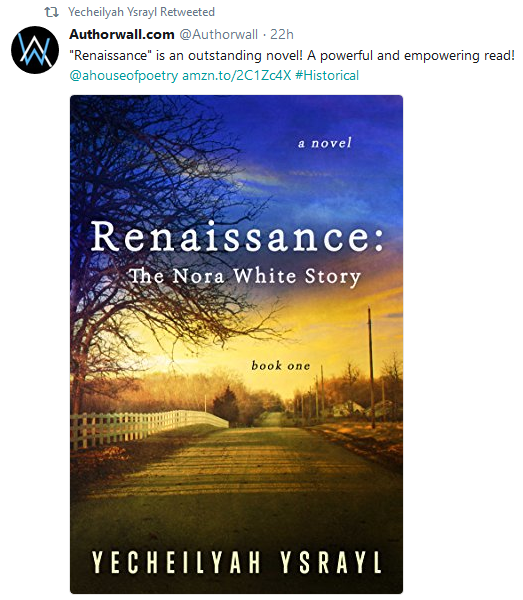
Many people have asked me about the cover for Renaissance. The truth is that it was a premade I was blessed to find! All the artist did was edit the text. Here’s what a reader said when leaving a review for the book on Amazon:

“The first thing that drew me to this novel was its beautiful cover. A deep blue sky fading into a sunset which bakes an old country road golden brown.”
Guys, I didn’t spend a lot of money on this.
As soon as I saw the cover I knew it was the right fit for Renaissance. Though it’s a premade, there are some things that made it unique:
- Although it was a premade, the photo is a real photo taken by Brittany Cox and then sold to designer Najla Qambers to be used for a premade book cover. It is not a stock photo.
- The elements of the photo fit the context of the story, which starts off in Jacksonville, MS where the White family owns and runs a farm.
- The book cover matches other books in my genre (Historical Fiction)
I looked at other covers and thought about purchasing a complete custom cover but my money wasn’t agreeing with that so I just went back to that same image, praying no one had taken it. The use of a real country road photo really sets it apart. It was also the only of its kind being sold so I was anxious to get it as it was literally just one available. When I was ready, I contacted Najla Qambers of Brick-a-Brack Photography and secured my cover.
-
Watch Out for Overly Used Stock Photos
One of the things that made the Renaissance cover unique is the use of a real photograph. There are some great premade design covers out there but many designers use the same stock photos. All designers will have a message that says the book cover is not sold after you buy it and the cover is removed, which is true. You will often see “Sold” on the designer’s site to indicate that cover has been taken. But while the same cover cannot be sold again, the same stock photo is sometimes used in a slightly different design. The particular cover you bought may not be sold again but the same stock images can be used again. Keep this in mind when looking for your premade.
Joshua Jadon sums it up pretty well:
“You also may get less attention from a generic cover because it may be a little easier to ignore. Readers are looking for something interesting and exciting that grabs their attention, and a book that might have the same cover—or at least the same images—as several others often won’t get that kind of attention. A unique style or look can influence readers’ selection process. If your cover doesn’t reflect that … well, it may not get noticed.”
But, your premade does not have to look generic.
“It always seems impossible until it’s done.” – Nelson Mandela
It is possible to find a stunning premade that looks custom made. I got tons of compliments on this cover and requests for who designed it. People thought it was custom made.
2. Watch out for Bulk Premade Deals
Boy did I fall for this one! Book cover design is a skill. Period. Even though there are designers offering bulk book covers at discounted prices you can edit in Photoshop, it won’t do you any good without skill. I made the mistake of falling for this and while some of the bulk covers I purchased are nice (and I am competent in editing covers in Photoshop), it is not something I will do again. A clever move by designers but not such a good deal for authors. Unless you are Photoshop Savvy, have someone on your team who is Photoshop Savvy, or you are a graphic designer, it will do little to benefit you to buy twenty premade book covers you have to design yourself using the software you don’t know how to use.
While it may start off looking professional, your lack of skill can make it look generic because graphic designers are skilled in typography, colors, blending colors, and anything else that may require a keen eye. You can mess up a nice cover not knowing what you’re doing which will lead you back to square one.
Here are some websites with some unique premade book covers. There are more, I am sure, but these are ones I’ve investigated myself. I rarely see the stock photos from their covers used by other designers.
For more posts on Indie Publishing, be sure to visit the new Indie Author Basics with EC page.